The Ultimate Guide to Creating a Website for Small Business with Webflow
Webflow is a popular website builder that offers a range of features and design options to create a professional and user-friendly website. Whether you're a small business owner looking to create a new website or revamp your existing one, Webflow can help you achieve your goals. Here's how to create a website for your small business with Webflow.
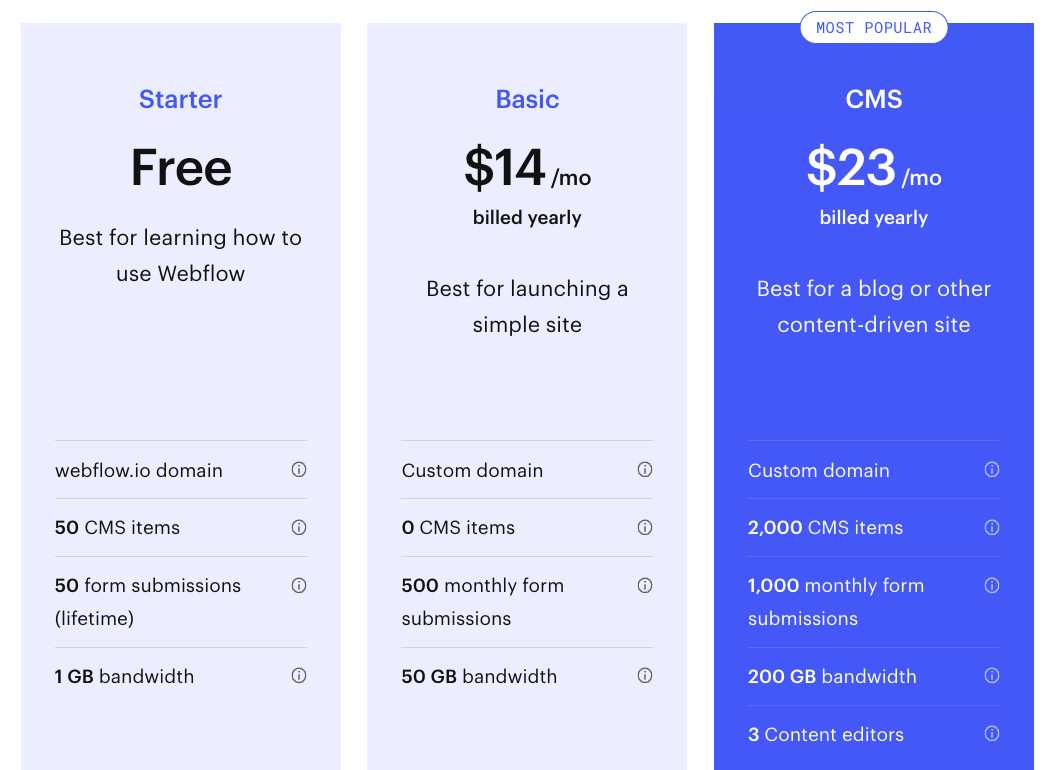
Step 1: Sign up for a free Webflow account
Fill in your email address and choose a password for your account, then click “Sign up.” You’ll be taken to a page where you can choose your plan. Select the “Free” plan, which allows you to create up to two projects and host them on a Webflow.io subdomain.
Step 2: Define your goals and target audience

Before you start creating a website with Webflow, it's essential to define your business goals and target audience. What do you want to achieve with your website, and who is your ideal customer? Understanding your audience's demographics, interests, and online behavior will help you create a website that appeals to them.
Step 3: Choose a Webflow template
Webflow offers a range of templates that you can use as a starting point for your website. These templates are pre-designed with different layouts, colors, and fonts, so you can choose one that aligns with your brand and style preferences. Alternatively, you can start from scratch and design your website from the ground up.
Step 4: Customize your design
Once you've selected a Webflow template or created a new design, it's time to customize it to match your brand and business goals. Use Webflow's drag-and-drop editor to add elements, change colors and fonts, and create a layout that works for your business. Make sure your design is user-friendly, responsive, and looks great on all devices.
Step 5: Create quality content
Your website content is the heart of your online presence. It's essential to create quality content that showcases your products or services, informs your audience, and drives engagement. Use a mix of text, images, and videos to create a dynamic and engaging website.
Step 6: Optimize for search engines
Search engine optimization (SEO) is crucial for improving your website's visibility in search engine results pages. Use Webflow's built-in SEO features, including meta descriptions and alt tags, to optimize your website for search engines. You can also include local keywords to target customers in your area.
Step 7: Launch and promote your website
Once you've created and optimized your website with Webflow, it's time to launch it and promote it. Share your website on social media, create business listings on online directories, and use email marketing to drive traffic to your website. Monitor your website's analytics to track your progress and make improvements over time.
Creating a website for your small business with Webflow is a great way to achieve your business goals and attract and engage potential customers. Follow these six steps to create a website that looks professional, functions well, and brings results. With Webflow's intuitive design interface, you'll be able to create a website that is tailored to your brand and stands out from the competition.
Sign up for a free Webflow account
If you have any questions, feel free to contact us at hola@mezcal.studio